Showing posts with label cookies. Show all posts

Friday, June 19, 2015

Pretty in Blue Cookies

My good friend Martilda is expecting her sweet baby boy next month. Of course we needed blue cookies for her baby shower! Blue is also Martilda's favorite color!


For the large cookie, I used a small salad plate as a guide to cut out a big circle of dough. I only added a couple of minutes to the baking time. The night before the baby shower, I used glacé icing to flood the cookie with white. The next day, once the icing was set, I used royal icing to pipe the words and to make the brush embroidery flowers. 

I love the bright white of the royal icing against the soft white of the glacé icing.


The polka dot cookies were decorated using the wet on wet technique with glacé icing.


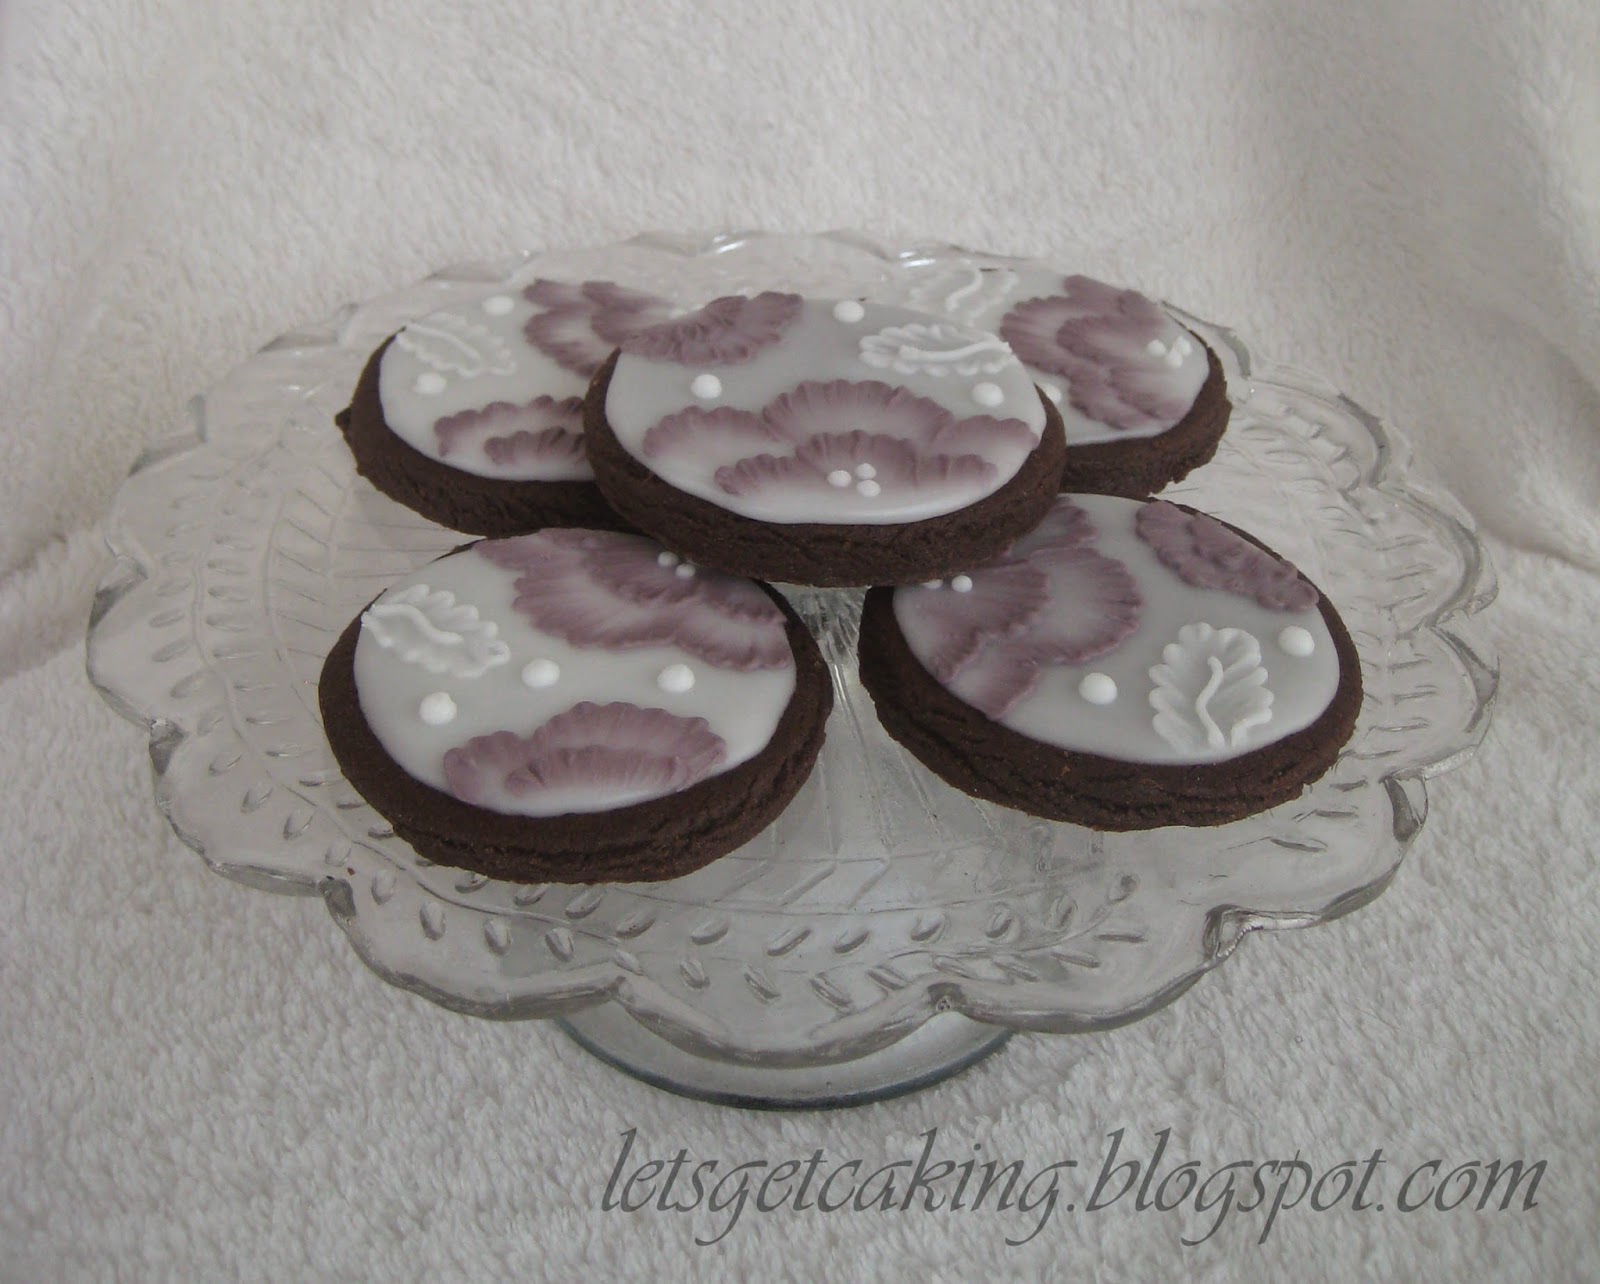
I decorated these cookies with tiny roses using a similar technique. I love using glacé icing for cookies because it sets well, but doesn't get rock hard like royal icing.


Congratulations, Martilda! I can't wait to meet your sweet new baby!

STATS:

No Fail Sugar Cookies

Chocolate Roll-Out Cookies

Glacé Icing

Royal Icing

Brush Embroidery Tutorial Video

"Wet on Wet" Tutorial Video

Sweet Ambs Tiny Flowers Tutorial Video


Saturday, March 2, 2013

Robbie's CTR Cookies

In December, I made some CTR cookies for a wonderful boy at church who was getting baptized. CTR stands for "Choose The Right." Members of our church will often wear a CTR ring as a reminder to always try to do good.


These cookies are decorated with glace icing. I first outlined the shape of the cookie using a #3 writing tip, then flooded the center with blue icing. Then, using the "wet on wet" technique, I piped the CTR letters. 

Here they are in my favorite drying area. It's a large picture frame box with a lid that opens and closes, similar to a pizza box. I like it because it doesn't take up much space and I can keep the cookies clean and covered with the lid, which still allows the icing to continue drying.


I try to be careful when flooding a cookie, but sometimes I go overboard with the amount of flood icing. You can see a "spillage" incident here. There are two ways to deal with this:

1. Allow the icing to dry, scrape it off with a knife and redecorate the cookie - it'll be good as new!
2. Eat it.


Glace icing is great because it dries smooth and shiny, and you can stack the cookies once the icing is dry without ruining the decoration. I prefer it over royal icing because it doesn't get rock hard. It's nice to bite into it - I prefer soft icing on my cookies, not crunchy.

Not having a shield cookie cutter, I cut a shield shape out of a piece of paper. Using that as a template, I cut the shapes out of the cookie dough with a sharp paring knife.


STATS:

No Fail Sugar Cookies
http://cakecentral.com/recipes/2055/no-fail-sugar-cookies

Glace Icing
http://www.thatreallyfrostsme.com/2010/05/glace-icing.html

"Wet on Wet" Technique
http://www.youtube.com/watch?v=nAIBpsXgtRE

Monday, January 28, 2013

Valentine Cookie Favors

I don't know who first came up with idea of putting a cookie in a cd sleeve, but I love it. I think it's brilliant! I love that the packaging is cheap and even comes with its own little window, perfectly shaped for a round cookie. These would be great to send to school for Valentine's Day. 


For this cookie, I followed Martha Stewart's recipe for cowboy cookies. The only change I made is that I used a 1/4 cup of cookie dough for each cookie instead of a tablespoon. I was able to fit 6 cookies to a cookie sheet. Then, I covered the cookie dough balls with as many pink and red M&M's as possible. Pack them in tightly because they will spread apart as the cookies bake.


The cookies will spread to about 4" in diameter. That seemed to be just the right size to fit into the cd sleeve without sliding around. I wrapped each cookie in plastic wrap before placing them into the cd sleeves.


This was a fun project! It would be fun to let the kids help with the baking, and then let them decorate the cd  sleeves however they like with markers and Valentine stickers. 

Happy Valentine's Day!

STATS:

Martha Stewart's Cowboy Cookies


Thursday, January 3, 2013

S'More Cookies

Just another version of the Cake Mix Cookie - very easy and very good!


S'More Cookies

chocolate cake mix
2 Eggs
1/3 cup oil
1 cup chocolate chips
2 cups miniature marshmallows
2 chocolate bars

Preheat oven to 350 degrees. In a large bowl, stir together cake mix, eggs, and oil until well combined. Mix in the chocolate chips. Using your hands, "smoosh" the marshmallows into the dough, then roll the dough into balls and place them on a cookie sheet. (Yes, "smoosh" is the technical French cooking term.) Then, break off small pieces of a chocolate bar and add a few to the top of each cookie. Bake for 7-10 minutes. Immediately transfer to a cooling rack. Cookies will be really soft when they first come out of the oven, but harden as they cool. Do not over bake.

Wanna see some more?


Yum!

For some more indoor S'More fun:

Oven S'Mores!
http://letsgetcaking.blogspot.com/2011/07/oven-smores.html

Wednesday, December 12, 2012

Lace Cookies for Christmas

This Christmas, I wanted to make something special for some wonderful women I know.
I found a design for intricate lace cookies at http://cakecreationsforyou.blogspot.com/. Nadia is the decorator from the site, and she creates beautiful cookies.

I'm really happy with how the cookies turned out!


To make the lace pattern, I first outlined the heart shape with royal icing. Using the same icing, I made 14 straight lines running diagonally across the cookie.


Then, I added perpendicular lines to create a grid.


I used glace icing (in a flood consistency), to fill in the larger spaces of the heart.


Then, I added dots of icing into the grid, creating a pattern I liked. There are so many patterns you could make using this technique. Have fun and get creative! 

I noticed that you get a very different look in the lace if you allow the grid to dry before adding the dots of icing. In this photo, I piped the dots while the icing of the grid was still wet. You can see how the design has sort of "melted" together.


On this cookie, I allowed the grid to dry before piping the dots. The dots stayed separate and are quite distinct. Honestly, I think both techniques made a pretty cookie, and I can't decide which I like better.


For the gold lettering, I mixed a little brown food coloring into the royal icing to get a tan color. I piped the words with the tan royal icing and allowed it to dry. Then, I mixed gold luster dust with a little vanilla extract and used that to "paint" the words. You can see the difference the luster dust makes here, where I only used luster dust on the letter "o" in "world."


I used zip-top baggies with the corners cut off as the icing bags for this entire project. If you would like to use piping bags and tips, I would suggest using a #1 or #2 writing tip.

I loved making these cookies and thinking about the women I'd be giving them to. I hope they know how much they are loved. 

STATS:

Nadia's Video: "How to Make a Lace Cookie" Tutorial
https://www.youtube.com/watch?v=sKjM7Wm845w

Chocolate Roll-Out Cookies
http://www.epicurious.com/recipes/food/views/Chocolate-Roll-Out-Cookies-240668

How to "flood" a cookie with icing
http://www.sweetsugarbelle.com/blog/2011/07/outlining-and-filling-cookies-with-royal-icing/

Royal Icing
http://letsgetcaking.blogspot.com/2012/12/royal-icing-recipe.html

Glacé Icing
http://www.thatreallyfrostsme.com/2010/05/glace-icing.html

Friday, November 9, 2012

Spice Cake Cookies

You've probably learned by now that I'm a big fan of cake mix cookies. You can use any flavor of cake mix, they're fast, and they're delicious.

It's the perfect time of year for spice cake, so I decided to make spice cake cookies.


They really are a tasty treat on their own...


....but, I thought some cream cheese frosting would go well with the spice cake cookies.


Yep. They were good.

If you have the time, you can add a little fondant flower and leaf, and they're ready to share!


STATS:

Cake Mix Cookies
http://letsgetcaking.blogspot.com/2009/10/cake-mix-cookies-recipe.html

Cream Cheese Frosting
http://www.bettycrocker.com/recipes/cream-cheese-frosting/b8566164-81e0-44e0-872c-b0fbe53c3280

Rhonda's Ultimate Marshmallow Fondant
http://cakecentral.com/recipe/rhondas-ultimate-mmf

Monday, October 22, 2012

My First Guest Post!

My friend Cat asked me to do a guest post on her blog http://nutsinanutshell.blogspot.com/. I was so excited and happy to do it! She said I could write about anything I wanted, so I chose to write about a brownie...on a paper plate...Here's a link to my post:

There's Nothing Better than a Brownie on a Paper Plate

Did you read it? Sweet! Now, since we're already on the subject of goody baking...


I thought we could use a blast from Halloween goodies past today:


Pumpkin Sugar Cookies


Spiderweb Cookies Tutorial


Cool Colors Spiderweb Cookies


Mummy Cookie
Happy Caking, Everyone!


Friday, June 15, 2012

Brush Embroidery Cookies

My brother Christian and my new sister-in-law Amber recently celebrated their marriage at an open house in Maryland. I was able to attend their wedding and reception (which were held in Utah), but I couldn't make it to the open house. I really wanted to participate in some way, and I decided to make cookies for the celebration.

These were dark chocolate cookies with a hint of cinnamon. This was a new recipe for me, and I really liked the flavor. They're delicious!


I used glace icing for the white background. After allowing the icing to dry overnight, I used royal icing to add decorations on top. I used a #2 writing tip to pipe the design. The flowers and leaves were done using the brush embroidery technique.


I used homemade green fondant mixed with modeling chocolate for the green background on these cookies. This technique is much faster because you can just roll out the fondant mixture, cut out circles, and attach them to the cookies with a little glaze. Very quick and easy. These were lemon sugar cookies.


To keep the cookies fresh, I wrapped each cookie in plastic wrap. To package them, I placed a big piece of bubble wrap in a box and then one layer of the wrapped cookies. I continued to layer plastic wrap and cookies until the box was full. I sent the cookies USPS. Luckily, the cookies traveled well and arrived in good shape. I think the biggest thing is to make sure there is no room in the box for the cookies to jostle around. If there is any extra room, they can shift during transport and break.

STATS:

Chocolate Roll Out Cookies

Glace Icing

Royal Icing

Tutorial on how to flood cookies with royal icing or glace icing

Brush Embroidery Tutorial


Tuesday, March 20, 2012

Christian and Amber's Wedding

I made these cookies for my brother's wedding reception. I loved being able to make the cookies for my brother and his new wife. Congratulations, Christian and Amber!

They decided on green as their wedding color, with just a touch of purple. They asked for rectangular monogrammed cookies and brush embroidered cookies.

My sister Melanni used her amazing photography skills to take this beautiful picture of the cookies at the reception.


On to my "point and shoot" pictures.


"A" is for Amber!


"C" is for Christian!


Lots of cookies!


These sugar cookies were first covered with green glacé icing. After the glacé icing dried, I used royal icing to pipe the monograms and the other decorations.

I used dark brown royal icing for the monogram and brushed it with gold luster dust mixed with a little water to get the shiny bronze look. The cookie on the left has been brushed with the luster dust and the one on the right has not. I really like the difference the luster dust makes.


For the brush embroidered cookies, I used green fondant for the base and white royal icing for the flowers. Click on the link below (in the STATS section) to watch a video on brush embroidery.


STATS:

Brush Embroidery Video
http://www.youtube.com/watch?v=FqbDTaauGO0

Rhonda's Ultimate Marshmallow Fondant
http://cakecentral.com/recipes/3183/rhondas-ultimate-mmf

Glacé Icing

Mix the following ingredients together:
1 cup confectioner's sugar : 1 Tbsp. light corn syrup : 1 Tbsp. milk

Adjust amount of milk to achieve desired consistency in icing. I usually end up adding 3 or 4 extra Tbsp. of milk to get a thinner flooding consistency.

Monday, February 27, 2012

Flower Cookies

These are white cake mix cookies, covered in melted white chocolate and decorated with fondant flowers. To ruffle the edges of the flowers, I rolled a toothpick along the edges to thin them. Then, I used extra balls of fondant to prop up the frilled edges while the fondant dried.


For the blue flower, I wanted an ombre effect, so I colored three small pieces of fondant different shades of blue. Then I layered them, darkest to lightest. I used sugar pearls for the centers of the flowers. Here is the royal icing piping before adding adding luster dust.


Here it is after. I used a tiny paintbrush to paint the writing with gold luster dust mixed with a little water.


STATS:

Cake Mix Cookies
http://letsgetcaking.blogspot.com/2009/10/cake-mix-cookies-recipe.html

Rhonda's Ultimate Marshmallow Fondant
http://cakecentral.com/recipes/3183/rhondas-ultimate-mmf

Sunday, October 23, 2011

Mummy Cookie

I had a little fondant left over from the cake pops, so when I made cookies today, I decided to experiment. Here's my little mummy.


I rolled the white fondant really thin and cut it into strips. Then, I just started laying them onto the frosted cookie. They eyes are green balls of fondant, and the black is royal icing.

Happy Halloween!

STATS:

Marshmallow Fondant
http://whatscookingamerica.net/PegW/Fondant.htm

Royal Icing
http://www.wilton.com/recipe/Royal-Icing

Saturday, September 17, 2011

Perfect Chocolate Chip Cookies

I found this recipe a few years ago, and it is my favorite chocolate chip recipe by far! The cookies are chewy, the edges don't burn, and the cookies are delicious! (Just make sure you follow the directions exactly, even down to the parchment paper.) I'm not sure where I found the recipe, but I shared it on a friend's blog in 2009:

http://jbeanrecipes.blogspot.com/2009/04/perfect-chocolate-chip-cookies.html

Take time to browse through Jill's blog. She's collected a TON of great recipes!


These were an experiment. I wanted to make some big cookies, and these guys were HUGE! I used maybe a little more than a quarter cup of dough for each one. Usually these cookies bake in 10-12 minutes, but these giants took about 18-20 minutes.


I washed and saved some restaurant take-out containers because I thought they were really pretty. I figured that I could put them to good use. These cookies are for my good friend Kristi. Thank you, Kristi!

Wednesday, August 24, 2011

Yellow Cake Mix Cookies

I always like to keep a box of cake mix in the cupboard. Not only for a quick cake, but quick cookies, too!


I used a yellow cake mix for the cookies. They are outlined and filled with glace icing. The flowers are made from fondant and sugar pearls.

STATS:

Cake Mix Cookies
http://letsgetcaking.blogspot.com/2009/10/cake-mix-cookies-recipe.html

Glacé Icing
1 cup confectioner's sugar : 1 Tbsp. light corn syrup : 1 Tbsp. milk (Adjust amount of milk to achieve desired consistency in icing. I usually end up adding 3 or 4 extra Tbsp. of milk to get a thinner flooding consistency.)

Rhonda's Ultimate Marshmallow Fondant
http://cakecentral.com/recipes/3183/rhondas-ultimate-mmf

Tuesday, July 12, 2011

Yellow Heart Cookies


These were just some quick cookies I made from a store bought cookie mix. The frosting is a Betty Crocker recipe and the flowers and leaves are made from homemade fondant.

STATS:

Betty Crocker Buttercream
http://www.bettycrocker.com/recipes/vanilla-buttercream-frosting/39107a19-be94-4571-9031-f1fc5bd1d606

Rhonda's Ultimate Marshmallow Fondant
http://cakecentral.com/recipes/3183/rhondas-ultimate-mmf/comment-page-1#comment-11.

Wednesday, March 16, 2011

St. Patrick's Day Magic

I love working with glacé icing! It's so much fun to add different colors to the cookies, and then swirl the icing around and watch pretty designs appear.


For the swirls, start by flooding your cookie with one solid base color. While the icing is still wet, pipe short lines in a swirl pattern, starting from the outside of the cookie and working in. Try alternating colors (I used dark and light green) for a fun effect, like this:


Now, drag a toothpick through the center of the lines, starting from the outside of the swirl and working to the center. Just follow the shaky black arrow I made in Microsoft Paint.


Now watch this beauty magically appear!


For the shamrocks, you will use a similar technique, just in a different pattern. Flood a cookie with white icing. While it is still wet, pipe 4 green lines in a square pattern. Drag a toothpick through each line, from the outside of the square to the center. Here is a diagram that might help you better visualize the process.


A little leprechaun magic...and you've got yourself a tasty four leaf clover!


I tried out a new recipe for my husband's grandmother, Memé, who loves lemon-flavored treats. I'll put a link to the lemon cookie recipe in the "STATS" section of this post. It's delicious!

STATS:

Lemon Cut-Out Cookies:
http://bakeat350.blogspot.com/2010/07/frosted-jumbo-animal-cookies.html
(After you click the link, scroll down to the bottom, and you'll see the recipe.)

Glacé Icing
1 cup confectioner's sugar : 1 Tbsp. light corn syrup : 1 Tbsp. milk (Adjust amount of milk to achieve desired consistency in icing. I usually end up adding 3 or 4 extra Tbsp. of milk to get a thinner flooding consistency.)

Video tutorial for piping wet on wet icing and the marbling technique
http://www.universityofcookie.com/2010/12/fun-and-easy-way-of-decorating.html